Battery switch on travel trailer function is crucial for managing your RV’s power. Understanding how this simple yet vital component works is key to preventing electrical issues and ensuring a smooth camping experience. This guide will walk you through the different types of switches, their operation, troubleshooting common problems, and essential safety precautions. We’ll cover everything from connecting your batteries to maintaining them, ensuring you’re equipped to handle any electrical situation on the road.
From basic operation to advanced troubleshooting, we’ll cover everything you need to know to confidently manage your travel trailer’s power system. We’ll explore the different types of battery switches, how they interact with other electrical components, and the importance of safety when working with batteries. This guide will empower you to keep your RV running smoothly, no matter where your adventures take you.
Understanding Battery Switch Functionality in Travel Trailers
Your travel trailer’s battery switch is a crucial component, acting as the central control for your trailer’s power systems. It allows you to disconnect or connect your house batteries to the trailer’s electrical system, preventing battery drain when the trailer isn’t in use and providing a safe way to manage power. Understanding its operation is key to maintaining your trailer’s electrical system and avoiding potential problems.
Battery Switch Types
Travel trailers utilize various battery switch configurations to manage power. The most common types include single battery switches, which control a single battery bank, and dual battery switches, which manage two separate battery banks (often one for house power and another for starting the tow vehicle). Some more advanced systems incorporate multi-bank switches or even sophisticated electronic switch systems with remote control capabilities.
The type of switch installed depends on the trailer’s electrical system complexity and power demands.
Internal Workings of a Battery Switch
A typical battery switch, whether single or dual, operates using a rotary or toggle mechanism. Inside, the switch consists of several heavy-duty contacts and a switching mechanism. When the switch is in the “on” position, it completes the electrical circuit, connecting the battery to the trailer’s electrical system. In the “off” position, the circuit is broken, isolating the battery and preventing current flow.
Some switches also incorporate a “both” or “combined” position to connect both batteries in parallel, increasing overall power capacity. These switches are usually designed to handle high amperage loads.
Operating a Battery Switch: A Step-by-Step Guide
Before operating the switch, always ensure that you understand the switch’s positions (e.g., “off,” “battery 1,” “battery 2,” “both”). Misoperation can lead to unexpected results or damage to the electrical system. Locate the battery switch, usually found near the batteries themselves or inside a dedicated compartment.
1. Identify the switch positions
Carefully examine the switch markings to understand their meaning.
2. Turn the switch to the “off” position
This completely disconnects the batteries from the trailer’s electrical system. This is crucial for long-term storage to prevent battery drain.
3. To use the house batteries
Turn the switch to the appropriate position (e.g., “battery 1” or “both” if applicable).
4. After use
When finished using the trailer, return the switch to the “off” position to conserve battery power.
Connecting and Disconnecting Batteries

Connecting and disconnecting your travel trailer’s battery to the chassis battery is a crucial task for both safety and functionality. Understanding the proper procedure and safety precautions will ensure a smooth and problem-free experience. Improper handling can lead to damage to your equipment or even injury.
The process involves using a battery switch, typically located near the battery compartment. This switch controls the flow of power between the trailer’s battery and the tow vehicle’s battery. Many switches are simple on/off, while others may offer multiple positions (e.g., “off,” “trailer,” “both,” “chassis”). Always consult your specific trailer’s manual for detailed instructions and switch configurations.
Connecting the Batteries
Before connecting, ensure the battery switch is in the “off” position. This prevents accidental short circuits. Next, carefully inspect both battery terminals for corrosion. Clean them with a wire brush and baking soda solution if necessary (see below for detailed cleaning instructions). Once clean, firmly connect the positive (+) cable to the positive terminal and the negative (-) cable to the negative terminal, ensuring a secure connection.
Finally, switch the battery switch to the desired position (usually “both” or “trailer” to utilize both batteries).
Disconnecting the Batteries
To disconnect, first switch the battery switch to the “off” position. This is crucial to prevent any accidental electrical discharges or short circuits. Then, carefully disconnect the negative (-) cable first, followed by the positive (+) cable. Always disconnect the negative cable first and connect it last as a safety precaution.
Maintaining Clean Battery Terminals and Connections
Clean battery terminals regularly to prevent corrosion buildup. Corrosion can impede electrical flow, leading to poor battery performance and even damage. Use a wire brush to remove loose corrosion, and then apply a baking soda paste (baking soda mixed with water) to neutralize any remaining acid. After cleaning, rinse with water and allow the terminals to dry completely before reconnecting.
For long-term protection, you can apply a battery terminal protector spray or grease. This prevents future corrosion and maintains a good connection.
Safety Precautions When Working with Batteries
Working with batteries requires caution. Always wear safety glasses to protect your eyes from potential splashes of acid. Ensure adequate ventilation in the area, as battery gases can be harmful. Avoid sparks or flames near the battery, as they can ignite the flammable hydrogen gas released by batteries. Never touch the battery terminals with metal tools.
So, you’re an audiophile who travels? Awesome! Make sure you check out this guide on audiophile travel setup before your next trip – it’s got some seriously good tips for keeping your tunes top-notch on the go. And speaking of travel, don’t forget about insurance! Protecting your investment is key, so look into Aon travel insurance for peace of mind.
You’ll want to be prepared for anything, from lost luggage to unexpected medical expenses, so get that sorted before you jet off.
Use insulated tools to prevent accidental short circuits. If you are unsure about any step, consult a qualified mechanic or RV technician.
Common Battery Connection Issues and Troubleshooting
| Issue | Cause | Solution | Additional Notes |
|---|---|---|---|
| No power to trailer | Loose or corroded connections | Clean and tighten connections. Check the battery switch. | Inspect all wiring for breaks or damage. |
| Battery draining quickly | Parasitic drain (something drawing power even when off) | Use a multimeter to check for parasitic draw. Disconnect components one by one to identify the culprit. | This may require professional assistance. |
| Battery switch malfunctioning | Faulty switch | Replace the battery switch. | Ensure you purchase a switch rated for the amperage of your system. |
| Low battery voltage | Dead or weak battery | Charge or replace the battery. | Regular battery maintenance (cleaning terminals, charging) can help prevent this. |
Battery Switch and Electrical System Integration
The battery switch is the central control point for your travel trailer’s electrical system, acting as a gatekeeper for power flow between your batteries and the various appliances and systems onboard. Understanding how it interacts with other components is crucial for safe and efficient operation. This section details the interplay between the battery switch and other key electrical elements, potential problems, and solutions.
Your battery switch works in conjunction with several other important components in your travel trailer’s electrical system. The most significant of these are the converter and the inverter. The converter, often referred to as a battery charger, transforms 120-volt AC power from a campsite hookup into 12-volt DC power to charge your batteries and supply power to 12-volt DC appliances (like lights and water pumps).
The inverter, on the other hand, converts 12-volt DC power from your batteries into 120-volt AC power to run household appliances (like microwaves and coffee makers) when you’re not connected to shore power. The battery switch determines which power source—your batteries or shore power—is used to charge the batteries and power the various DC circuits in your trailer.
Consequences of Incorrect Battery Switch Usage
Incorrectly using the battery switch can lead to several problems. For instance, leaving the switch in the “off” position while connected to shore power prevents the batteries from charging. This can leave you with a dead battery when you need it most, particularly if you rely on battery power for essential functions like lighting. Conversely, leaving the switch in the “both” position while disconnected from shore power will rapidly drain your batteries as they power both the 12V system and any 120V appliances running through the inverter.
So, you’re an audiophile who travels? Awesome! Make sure you check out this guide on audiophile travel setups to keep your ears happy on the go. It’s all about packing smart, not heavy. And while you’re planning, don’t forget to sort out your travel insurance! Getting Aon travel insurance beforehand is a smart move; you’ll have peace of mind knowing you’re covered for any mishaps, allowing you to fully enjoy your music and adventures.
This can lead to a complete battery discharge and potential damage to the batteries themselves. Additionally, incorrect switching can lead to unexpected power surges or short circuits, potentially damaging sensitive electronics within your trailer.
Common Battery Switch Problems and Solutions
Several common issues can arise with your battery switch. One frequent problem is a corroded switch. Corrosion can prevent proper electrical contact, leading to inconsistent power delivery or a complete failure of the switch. Cleaning the switch terminals with a wire brush and applying a corrosion inhibitor is usually a sufficient solution. Another common issue is a faulty switch itself.
If cleaning doesn’t resolve the problem, the switch may need replacement. This requires disconnecting the batteries and carefully replacing the faulty switch, ensuring correct wiring. Finally, loose or corroded connections in the wiring leading to or from the battery switch are also potential sources of problems. These should be inspected and repaired or replaced as needed.
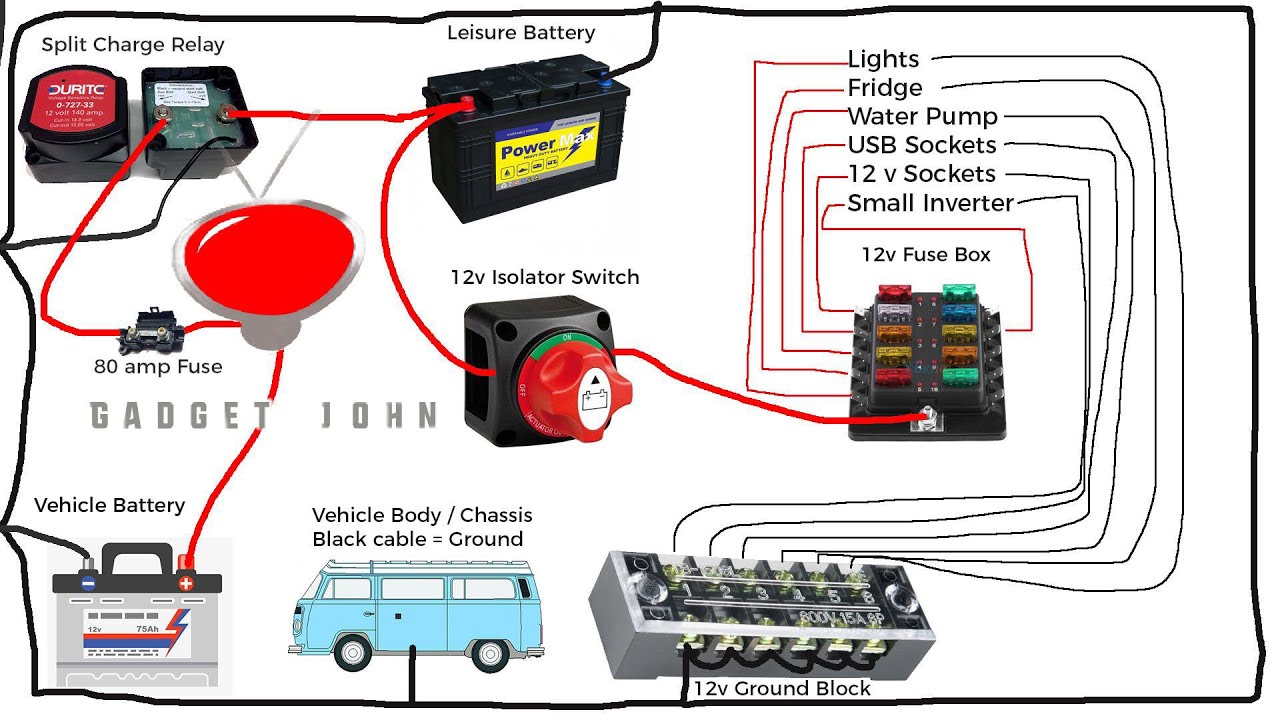
Diagram of Electricity Flow
Imagine a simple diagram. At the top, we have two battery terminals (positive and negative) representing your trailer’s batteries. From these terminals, wires lead down to the battery switch. The switch itself is depicted as a three-way switch, with positions labeled “Off,” “Battery,” and “Both.” From the switch, wires branch out. One set of wires goes directly to the 12-volt DC circuits in your trailer (lights, water pump, etc.).
Another set of wires connects to the converter. The converter is shown as a box with an input for shore power (120V AC) and an output for 12V DC. Finally, a separate set of wires connects to the inverter, which is depicted as another box with a 12V DC input and a 120V AC output. The flow of electricity depends on the position of the battery switch.
In the “Battery” position, power flows from the batteries to the 12V circuits and the inverter. In the “Both” position, power flows from the batteries and shore power (if connected) to the 12V circuits and the converter (charging the batteries). In the “Off” position, no power flows from the batteries to the circuits or to the converter.
Battery Switch Maintenance and Safety
Keeping your travel trailer’s battery system in top shape is crucial for reliable power on the road. Regular maintenance of your battery switch and related components will prevent problems and extend the life of your batteries and the switch itself. Neglecting this can lead to costly repairs or even dangerous situations.Regular inspections and preventative maintenance are key to a safe and functional battery system.
This section details a routine maintenance schedule, explains the importance of regular inspections, and highlights ways to extend the lifespan of your battery switch and batteries. We’ll also discuss potential fire hazards and how to avoid them.
Routine Maintenance Schedule
A simple routine will significantly improve the lifespan and reliability of your battery switch and related components. This schedule focuses on preventative maintenance, catching potential problems before they escalate. Aim to perform these checks at least once every three months, or more frequently if you use your travel trailer extensively.
- Visual Inspection: Check all battery connections for corrosion, looseness, and damage. Look for any signs of overheating or melting around the switch and cables. Inspect the battery switch itself for any signs of damage or wear.
- Tighten Connections: Use a wrench to firmly tighten all battery terminals and cable connections. Corrosion can create a poor connection, leading to voltage drop and reduced battery life. A clean, tight connection is essential.
- Clean Terminals: Use a wire brush or terminal cleaner to remove any corrosion from battery terminals and cable ends. A baking soda and water paste can also effectively clean corrosion.
- Switch Operation: Cycle the battery switch through all its positions (e.g., battery 1, battery 2, both, off) to ensure smooth operation. Listen for any unusual noises or resistance.
- Battery Water Levels (for flooded lead-acid batteries): Check the water levels in your flooded lead-acid batteries (if applicable) and add distilled water as needed. Never use tap water.
Importance of Regular Inspections of Battery Connections and Cables
Regular inspection of battery connections and cables is critical for several reasons. Loose or corroded connections create resistance, leading to voltage drop and reduced battery performance. This can result in insufficient power for your appliances, premature battery failure, and even overheating, which presents a significant fire hazard. Damaged cables can also cause short circuits, potentially leading to a fire.
Tips for Extending the Lifespan of the Battery Switch and Batteries, Battery switch on travel trailer function
Several simple practices can significantly extend the life of both your battery switch and batteries.
- Proper Ventilation: Ensure adequate ventilation around your batteries to prevent overheating. Batteries generate heat during charging and discharging, and poor ventilation can accelerate degradation.
- Avoid Deep Discharges: Frequently discharging your batteries to very low levels significantly reduces their lifespan. Try to keep your batteries above 50% charge whenever possible.
- Regular Charging: Maintain a regular charging schedule to keep your batteries fully charged. Use a proper battery charger appropriate for your battery type.
- Protect from Extreme Temperatures: Avoid exposing your batteries and switch to extreme heat or cold. Extreme temperatures can damage batteries and shorten their lifespan.
Potential Fire Hazards Associated with Incorrect Battery Handling and Switch Operation
Improper battery handling and switch operation can create serious fire hazards. Hydrogen gas is produced during the charging process of lead-acid batteries, and it’s highly flammable. Sparks from loose connections or a faulty switch can ignite this gas, leading to a potentially explosive situation. Overheating batteries can also ignite nearby flammable materials. Always follow safety precautions when working with batteries and the battery switch, including wearing appropriate safety glasses and gloves.
Never smoke near batteries. Always ensure proper ventilation. A faulty battery switch can cause short circuits, leading to excessive heat and potentially a fire.
Mastering your travel trailer’s battery switch is a crucial step towards enjoying worry-free RVing. By understanding its function, performing regular maintenance, and knowing how to troubleshoot common problems, you can confidently manage your trailer’s power and prevent costly repairs. Remember, safety is paramount when working with batteries; always prioritize proper procedures and seek professional help when needed. Happy travels!
Questions and Answers: Battery Switch On Travel Trailer Function
What happens if I leave my battery switch in the “off” position?
Leaving the switch off completely disconnects your house batteries from the charging system and any powered devices in your trailer. Your trailer will be without power.
Can I use a different type of battery with my existing battery switch?
While many switches are compatible with various battery types, it’s best to check your switch’s specifications and consult the manufacturer’s instructions to ensure compatibility. Using an incorrect battery type could damage your switch or other components.
How often should I inspect my battery switch and connections?
Inspect your battery switch and connections at least once a month, and more frequently if you’re using your trailer extensively. Look for corrosion, loose connections, or any signs of damage.
My battery switch is making a clicking sound. What does this mean?
A clicking sound often indicates a problem with the switch itself or a low battery voltage. Check your battery voltage and consider replacing the switch if the problem persists.
